October 15, 2008

Things my kid will eat - Home Edition: part 1


I just wanted to share this easy meal with all the parents out there!
It's a quick meal that your kids can really get into the preparation of, and make their pizzas completely personalized to suit their taste buds!

You'll need:

English Muffins
A Jar of Pizza Sauce
Mozzarella cheese (shredded)
Veggie toppings of your children's choices!

It's simple. Pull out the toaster and slap some English Muffins in. Toast them 'til they're crispy and then have the children put a tablespoon of sauce on each side. Sprinkle with cheese and the toppings of their choice. Get the oven to broiling, and place the prepared muffins on a baking sheet.
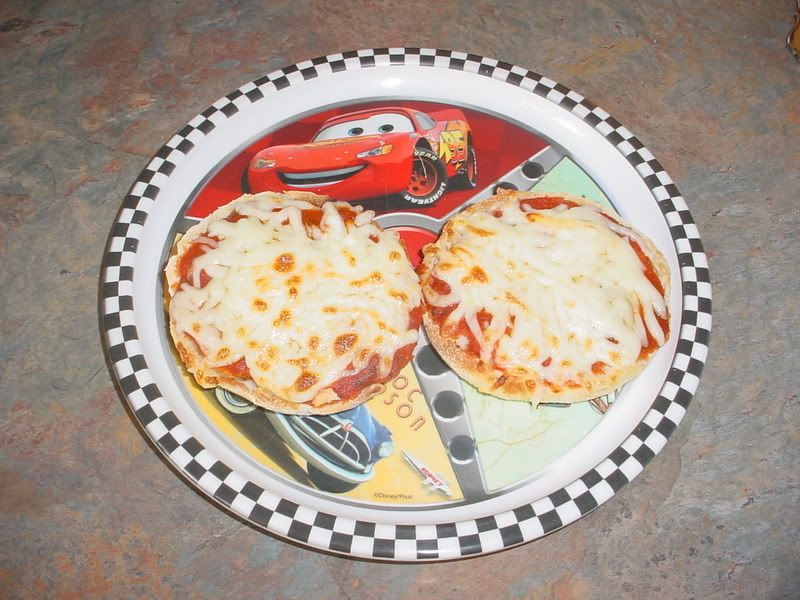
Broil until the cheese is completely melted and looking exactly how you like it to look. Personally, Boogie and I go for the "Slightly browned" look, so I leave them in a tad longer.

VIOLA! You're done! You can either cut them into fourths with a pizza slicer, or just let them cool a bit and let the kids eat them in one piece!

Tonight he was wanting just a plain cheese pizza, so it was even simpler. Here's some pics for ya!


Hey, Boogie! How's it taste?

Things my kid wil eat - School Edition


I hate to call him picky when it comes to eating... but Boogie isn't a fan of textures. He gags on oatmeal and scrambled eggs, and raisins are a big ole "absolutely not, Mom!" These are some of the normal foods that kids don't mind eating, but my son turns his nose at. So, I have to get creative. Whether it's meals at home, or lunches packed for school, the ordinary just won't do.

The first thing I'd like to tell you about is his school lunches. In a month's time, he will only buy the school lunch approx. 4 times a month. But are they the normal lunches he'll eat? Things that most kids get excited to see on the menu? Nope!

Pizza from school? No. Cheese or Pepperoni pizza from the delivery guy? YUM - OH BOY!
Watery tomato soup and grilled cheese? Sure!
Hot Dogs? You betcha!

But don't put a cheese burger in front of him, or chicken nuggets, because he'll politely refuse.
Fruit? Only if it's an apple or a banana. Otherwise, he gags. The kid loves Yogurt - but only in the non-fruit-pieces-dwelling-kinds.

So, like I said, I got creative!

I don't have a picture of this yet, but I'll be happy to add one tomorrow after I make this for his lunch:

Turkey Burritos. That's what he calls it. I call it "Whatever it takes to get you to eat your entire lunch". :)

I spread a little cream cheese on an 8" flour tortilla, and then put down an even layer or two of Carl Budding's "turkey" lunchmeat (found in your grocer's meat department) and then a dab of ketchup spread around on top. Then I start at one end and roll to the other. After cutting it into 2 pieces, I put it in a ziplock baggie, ready to go! Sometimes I add grated carrots if it's a morning where I've gotten up earlier than normal and have had at least a half pot of coffee and a whole lotta energy for grating.

(Picture will go here!)

And another thing I do is make my own version of "Lunchables". Our budget is such that I can't justify spending $2.50 - $3.00 on a little dab of meat and cheese and a cookie... So I make "Momables" :)

Oh! And here's where I tell you of a packer's greatest friend: The tiny "take-along" containers from Glad and Ziplock.


These little beauties are a Godsend! Boogie takes them to school filled with goodies and is really good at remembering to bring them home.

I pack his "Momables" along in these babies, and they've proven to be quite handy for other things, too!

Basically, I take a slice of bologna and cut it into thirds in one direction, then flip the plate and cut it into thirds going in the other direction. Then I take two slices of cheese and cut both up into fourths. Starting with the bologna, I layer both cheese and bologna in the container, going every other one. I end with the bologna on top, and then put Ritz crackers in a ziplock baggie for him to make his little cracker sandwiches out of! Perfect!

How do I keep it cool/cold, you may ask? Well, at the beginning of the year, I bought a six pack of Sunny D. It comes in those cute little bottles with the locking drink caps at the top. Each night I wash the day's bottle and put in the drainer to dry, and then grab a clean one from the cupboard. Since my son's picky about his fruit choices, I buy Juicy Juice for him. No dyes to make him hyper, no high fructose corn syrup to make his glucose levels out of whack, and no preservatives! I fill the bottles 1/3 of the way full of the Juicy Juice and then pop it into the freezer. By the next morning, when the juice is completely frozen, I top it off with juice from the fridge and pack it in his lunch. By the time he gets to go eat, the iced juice is pretty much melted, and it's kept all his other food cold in his handy dandy Speed Racer lunchbag. YAY!

Now, going back to those mini containers! Let's talk economics!

You could either buy applesauce in the six packs at the grocery store to send to school with your kid, and spend $2.99 on up for them, or you could do what I do... use the containers I posted about above and then spend $1.99 or so on a big jar of cinnamon applesauce and get about three times that amount! Slap a spoon in the lunchbag, and that portion is taken care of!

I've also used these containers for ranch dressing when I send carrots/celery/broccoli (yes, the child loves broccoli - amazingly) and he scarfs it up!

They're great for making jello in, slap it in the fridge, and then adding to the lunch pack - same with pudding! Cost effecient lil buggers, I'm tellin' ya!

For a change, every once in a while, I make him a bologna and cheese sandwich on boring ole bread (his words, not mine) - but to "spice" it up a little bit, I get out the big ole cookie cutters and cut a sun, flower, car, or star shape for his eating pleasure. He digs it... and to top his lunches off every day I'm always sure to add one key item to the lunch bag.

One of many of the silliest jokes I've come across while googling. :)

And I've just realized something... you'd think I owned stock in Ziplock as much as I've mentioned them just now.

So good, even the dog will eat it!


Puppy Chow!

9 cup Chex
1 cup chocolate chips
1/2 cup peanut butter
1/4 cup butter
1/4 teaspoon vanilla
1 1/2 cup powdered sugar

Put cereal in large bowl. Melt chocolate chips, peanut butter, and butter. Remove from heat and stir in vanilla.

Pour over Chex cereal, put into a large plastic bag with powdered sugar and shake well to coat.

Spread mixture evenly on wax paper and allow to cool.


*** Now, I put the coated Chex and the powdered sugar in a big paper bag and shook the dickens out of it - worked perfectly! Then I put portions into those small little ziplock snack bags! The kids all loved it - well, almost all of them. There's always one "Picky McPickyson" who says, "eewwww... that looks like something my cow vomits up!" but for the most part, I promise they'll love it. Just make sure that there are no peanut allergies in the class!

Dipped, Drizzled, and Decorated!


This one's definitely a kid favorite! Not only is it super easy to do, but it's actually kinda fun!

I've got a TV in my kitchen (because I pretty much live in the kitchen) and there's nothing I love to do more than find a movie from the 80's that I've seen umpteen times already, and get out a project like this!

What you'll need:

*1 bag chocolate or flavored chips (Semisweet, bittersweet, milk chocolate, green mint, white chocolate, butterscotch - the skies the limit!)
*1 bag pretzel rods
*Assorted toppings; jimmies, sprinkles, chopped nuts, coconut, cookie crumbs, and/or colored sugars


Place chips in microwavable bowl. (Be sure bowl and utensils are completely dry.) Cover with plastic wrap and turn back on corner to vent. Microwave on HIGH for 1 minute. Stir. Microwave at 30 second intervals, stirring after each interval, until chips are completely melted. Check frequently - and stir just as often.

Dip one half of the pretzel rods into the melted chocolate and decorate. Roll coated end of several pretzels in toppings of your choice. Drizzle others with contrasting colored chocolate.

Place decorate pretzels on wire rack set over baking sheet lined with waxed paper. Let coating harden completely. Do not refrigerate.

*** Now, when I did it, I didn't like how the weight of the jimmies and sprinkles worked with gravity, making the chocolate ooze down between the baking rack wires... so that's what I chose to use coffee mugs - if it decided to ooze, then it'd just ooze on down itself!

We had miniature pretzel sticks and I played around with those, too.

Now, this may sound disgusting, but BEAST (my dear hubby) was helping me, and we decided to play around with various household snacks that we could dip in chocolate!

Potato chips: He loved it, I didn't.
Fritos: SCORE! Delish! Try it!
Green Olives: Uh. Yeah. Just as nasty as it sounds...
Oreos: Well, there's a no-brainer!
Popcorn: Yummmmmmmmy!
Turkey Lunchmeat: (can't go on... I'm having horrible flashbacks...)

ENJOY!

Another reason to love Pumpkins!


Are you sitting down? Good! Now let me pre-warn you that what I'm about to share with you might possibly become an addiction. One of those things that sits in your fridge, looking all innocent and cute... but it's devilish qualities will call out to you in the middle of the night....

"Mommy Sunshine, come to me. Eat me. Dip your graham crackers in me while you sit in a sleepy stupor at your kitchen table, with only the light from the open fridge door to keep you company! Run out of crackers? That's perfectly fine! Just stick your finger in my gooey goodness and act like it's your first birthday and I'm your first taste of icing. Yes. I'm that good."

Okay. Consider yourselves warned! You can see from the picture above how innocent this little thing is...

What we're making today is PUMPKIN COOKIE DIP! mmmmmm I just got chills thinking of it!

What you need:

29-oz. can pumpkin pie filling
4 c. powdered sugar
2 8-oz. pkgs. cream cheese - softened
2 t. cinnamon
1 t. ground ginger
gingerbread cookies or graham crackers

Combine pumpkin, sugar and cream cheese in a serving bowl. Mix well: Stir in cinnamon (I usually add a little more because I love it) and ginger.

Yup! That's it!

Now, you can either leave it in the bowl that you mixed it in, or transfer it to another bowl (helps with the "pretty" factor) or, if you're an overachiever like me, you'll want to do this:

Find a cute medium sized pumpkin and cut the top off in a jagged zig zag pattern. Clean out the innards completely, and fill the pumpkin with the dip! Replace the lid and refrigerate until you're ready to serve it or take it out of the house.

My son's kindergarten class loved this so much that they've requested that I make it again this year for our 2008 Harvest Party! And the bonus is that this recipe makes more than enough for you to take a batch to school, and leave a batch at home!

If you look at the picture at the top, that's the pumpkin, filled with the dip, wearing the lid.

The finished product:


Monster Hands! Yummy and Spooky!


Ain't they just the cutest?.....er....um.... I mean "spookiest"?!?
I made these last Halloween for the kids in my son's class. At his school, Halloween isn't a focal point of celebration, so we have "Harvest Parties" instead. But, I couldn't bear the thought to let this idea go to waist! They're super easy to make and were a huge hit with all of the kids on my son's day to contribute snacks!

You'll need:

*A box of plastic food service gloves
(got mine at Sam's Club, and am not even close to seeing the bottom of the box!)
*A big ole bowl of freshly popped popcorn
(pre-popped would work just as well, I suppose, but you'd lose out on that awesome scent of burnt kernels throughout the air venting system in your house)
*A big bag of candy corn (don't eat them all before you make the Monster Hands, or you'll have to go back to the store to get more. I speak from experience.)
*A big bag of novelty spooky toys and spider rings and bugs, or whatever. (I suggest swishing these toys around in soap water and letting them dry thoroughly before using.)
* A handful of twisty ties (I "borrowed" a handful from our local grocery store's produce department. Hey! It's for the children!)

First, pop that popcorn! I'm not sure how much to tell you to make, because I do the stove-top popcorn in an old re-vamped pressure cooker, but I can say with all certainty that you just keep making it until you don't need to anymore! Don't forget to salt it! You could even add that yummy fake cheddar sprinkle stuff for an added kick.

Now, figure up how many kids you'll be making Monster Hands for. Count out that many bags, and put about 4-5 pieces of candy corn down into the fingers of all the gloves. These shall be the Monster Fingernails! Fill the rest of the fingers up with pieces of popcorn, and once all the digits are filled, you'll throw in a novelty toy here and there. Fill with more popcorn and then toss in another toy. Keep doing this to your heart's desire until you've gotten near the top. Don't fill the glove up entirely with popcorn, because we need some space to twist and tie without worry that the hands will fall open during transit.

Twist the glove and tie it closed, and VIOLA! Instant smiles from all who recieve them!

Optional treats to add with the popcorn: M&M's look like warts; Dried Apple chips; Sunflower seeds; Raisins; etc...etc...etc...

ENJOY!

October 14, 2008

Allow me to introduce myself...

First of all, let me welcome you to my new blog! You must have stumbled across me somehow, or perhaps you're a dear friend that's been coerced into checking out the digs here because I threatened you with a front porch full of zucchini! Either way, I'm glad you stopped by!

I should explain to you now why I chose the name "Mrs. Mommy Sunshine". Now, the first two words are kinda obvious. :) I've been married for ten years, and I'm a Mom - but the Sunshine part is how I see myself. I've never been one of those moms who whip out their kids' pictures at every passerby in the grocery store (although, I've been guilty of doing it in the gas station), and I like to think that I've kept my individuality, while at the same time being the bestest Mommy I could possibly be. "Sunshine" is what I call my happiness and spirited nature. I try to take as many opportunities as I can to let my inner sunshine reach out to the lives of others, and hopefully touch them with the warmth from a sun's rays. Yeah, I actually just said that. Yeah, I know it sounds corny. Yeah.... well, I'm not ashamed of it, either. And ya know what else? I have taken great care in the hopes that my son shoots out those same rays of happiness. (mwahahahaha - now there's two of us)

Wanna see a pic? (okay, make that gas stations and blogs)


Mommy Sunshine and Boogie. :) Yeah, I call him "Boogie" and I assure you he not only answers to the name, but actually likes it. One day he'll realize that it's short for "Booger", and may not like it as well. Please don't tell him - I don't have any other nicknames on reserve! This picture was taken on Mother's Day this past spring, in his classroom. Notice the beautiful tissue paper flower that I'm holding? I shall share the creative process for that big ole bunch o' cuteness in the future!

Anywho, I've noticed in my web-travels that there are a whole lotta sites out there that you can find during sporadic googling, that have oodles of ideas for fun parent/child activities, or ideas for Room Mothering, and I thought I'd share some of my personal experiences with these creations and ideas. I'd absolutely love if you felt the need to share your opinions, experiences, and questions with everyone by posting a comment... so feel free to do so at any time!